Mac OS X : Pullprint - manual setup
From IThelp
To be able to print to UiB (pullprint) printers from your own private computer, you need a VPN connection.
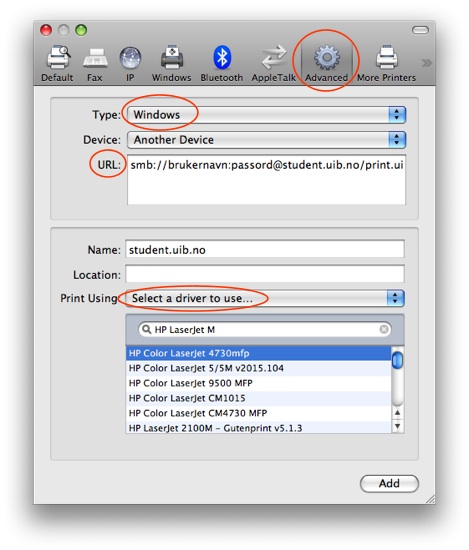
1. Go to System Preferences and click "Printer & Fax"2. Click the [+] in the bottom left corner to add a printer. 3. If you do not have an "Advanced" button: Right-click the toolbar (Ctrl-click if you have just one mouse button) in the "Add printer" dialogue and choose "Customize toolbar". Then you can drag an "Advanced" button (looks like a gear wheel) to the toolbar. Then click the Advanced button.. 4. Wait a few seconds to be able to choose windows from the "Type" menu. Then you can add this URL: smb://username:password@student.uib.no/pullprint.uib.no/pullprint (for studenter) smb://username:passord@ansatt.uib.no/pullprint.uib.no/pullprint (for ansatte) If above URL doesn't work (the printer doesn't receive your document), then use smb://username:passord@uib.no/pullprint.uib.no/pullprint (for ansatte) Note: Remember to exchange "username" and "password" with your own user name and password respectively.

5. Select Driver For Pullprint: If you wish to just print in black and white "HP LaserJet 6L -Gutenprint 5.1.3" should work. If you need colors you can use "HP Color LaserJet 4730mfp". Then you also need to use pullprint.uib.no/pullprintColor in the URL (above). Have a look at the general web page about PullPrint at UiB for other print options (pdf, A3) and combinations. 6. Click "Add".
