Digital meetings with Teams: Difference between revisions
No edit summary |
|||
| (One intermediate revision by the same user not shown) | |||
| Line 1: | Line 1: | ||
{{outdated}} | |||
This information may exist in a more complete or updated version in [https://hjelp.uib.no/tas/secure/mango/knowledgebasebrowse?unid=2944d42c9baf4b9b9dae234a142a3555 UiBhjelp]. | |||
''' Familiarize yourself with our recommendations for [[Secure behaviour in digital meetings]]! | ''' Familiarize yourself with our recommendations for [[Secure behaviour in digital meetings]]! | ||
== Schedule a Teams meeting (from Outlook) == | == Schedule a Teams meeting (from Outlook) == | ||
Latest revision as of 12:39, 22 March 2021
This information may exist in a more complete or updated version in UiBhjelp.
Familiarize yourself with our recommendations for Secure behaviour in digital meetings!
Schedule a Teams meeting (from Outlook)
You can schdule the meeting and invite participants from your Outlook calendar.
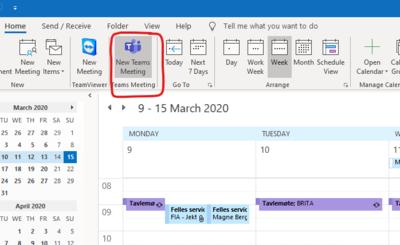
Select "New Teams Meeting" on the ribbon. Include all participants in the To-field.
Otherwise this is like a regular Outlook meeting.
(If you do not have the Teams button available in Outlook, log in to desktop.uib.no and schedule the meeting using Outlook from there.)
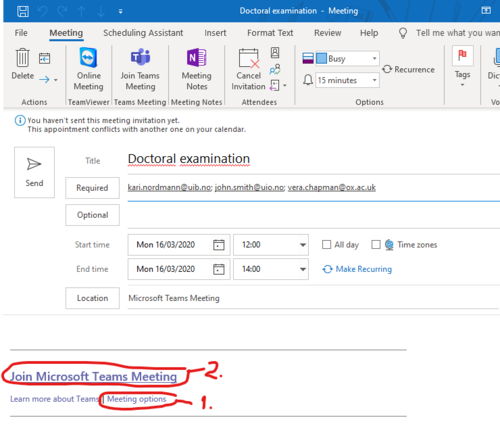
A link will automatically be added to the meeting occurence (marked with 2 in the picture below). This is the link participants click to attend the meeting, using the Teams program (if they have it installed) or a regular web browser.
You may use the link meeting options (marked 1 in the image - hold down CTRL while clicking "meeting options") to adjust settings for the meeting:
== Meeting Options for Teams Meeting ==
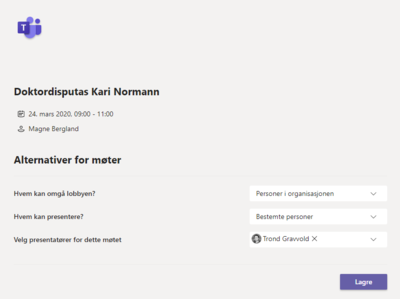
In the meeting settings, you can choose:
- "Who can bypass the lobby?". If you select "Everyone", anyone can join the meeting. If you choose other options, one of the participants in the meeting must "let in" any external participants. (This must be attended to during the meeting.)
- You also choose who can present at the meeting. The ones you choose here are given the "Presenter" role. This also include some other rights, including to eject other meeting participants and mute their microphones. (See detailed description of the roles' rights.) It may therefore be advisable to limit the number of presenters.
- Remember to click "Save".
Invite a larger group ("open meeting")
If you want to invite a larger group to the meeting, you don't have to include the whole list in your invitation. You can copy the link to the meeting and share it in an email, in a Team or by other means:
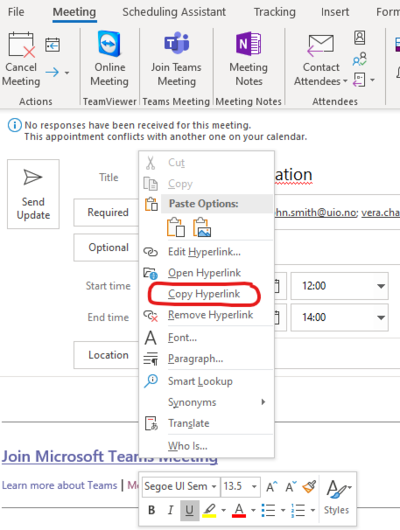
- Right-click the text "Join Microsoft Teams Meeting" and select "Copy Hyperlink". You will then have copied the link used to attend the meeting.
- The link you copied is very long! Instead of pasting the entire link into a message, you might want to use a text like "click here to join the meeting" with the link itself as a hyperlink.
Alternatively, you can replace the link with a shortened link, made e.g. at tinyurl.com. - Anyone who receives the link can access the meeting, either through a web browser or the Teams program (if they have it installed). Remember to let participants in from the lobby, if enabled.
Conduct the Teams meeting
- Click on the link to attend the meeting. The first participant to enter the meeting starts the meeting.
- If there are more than a few participants, it is advisable that everyone mutes their microphones when not talking.
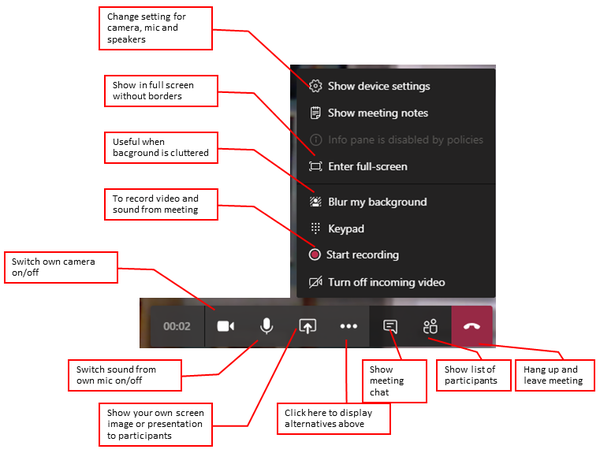
- Familiarize yourself with the controls in the menu (see image):
- If you have chosen that only you or only selected participants can present, you may change this during the meeting. You can allow other participants to present by "promoting" them from "Attendee" to "Presenter". Open the list of meeting participants, right-click on the attendee and select the status.
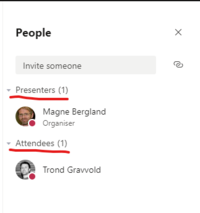
"Presenters" may present (show images from their machine), and mute the microphones of other meeting participants.
Streaming and recording Teams meetings
Streaming
Instead of a regular Teams meeting, you can create a Teams Live Event and stream the meeting to a larger audience. Live Events should be considered if
- there is a big audience
- it is important to make sure that the audience is unable to speak or break into the meeting
- you want more control over the technical production of the content, e.g. which speaker is displayed on the screen at any given time.
You schedule a Teams Live Event through the calendar in the Teams program. During the broadcast there should be a "producer" who controls the content. (Not be the same person who is presenting/speaking.) Please see Microsoft's information pages on how to prepare and conduct a live event. (The "More information" section at the bottom of this page.)
Recording
- At the start of a meeting or during the meeting, you can start recording the meeting by using the "Start Recording" button on the menu (see image above).
- Remember to inform participants that the meeting is being recorded. If the recording is to be published in any way, the participants must consent to this.
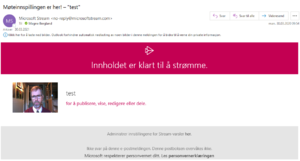
- Shortly after the recording is stopped or the meeting has ended, the recording will be ready for use in Microsoft Stream. You can then view the recording in Teams and you will receive an email about this:
- Click the link "to publish, view, edit or share" to get to the video in Stream. Here you can trim (cut away parts at the beginning or end) and share the video.
Please see Microsoft's information pages on how to create and manage recordings for more information.
Please note!
- If it is particularly important to prevent unauthorized persons from participating: Please nota that colleagues at UiB who have the meeting link, can enter the meeting. You should keep track of who is in the meeting at any time if the meeting invitation or link is shared outside a small group.
- The chat for the meeting is open to anyone attending or invited to the meeting, even after leaving the meeting and after the meeting is closed!
- During the meeting, it may be helpful to keep track of the list of meeting participants. to make sure that the audience has muted their microphones. If there is noise from one of the meeting participants' microphones, the administrator can mute thir microphone.
- If you do not use Outlook/Exchange email, you also do not have an Outlook calendar and cannot schedule Teams meetings. If necessary, contact the IT division to use Outlook/Exchange email and calendar.
- There is a Calendar feature in the Teams program where you can schedule meetings. It is only available to Exchange Online e-mail users. There are currently only a few such users at UiB, but there will be more in the future. We still recommend that you schedule you meeting and send the invitation in Outlook, as described above.
Recommendations for equipment etc. at digital meetings
- We recommend using headset with microphone (alternatively a good conference speaker with microphone). Built-in speaker and microphone should only be used in an emergency.
A detached USB camera can provide better picture angle and size than a built-in camera. If using a built-in camera, try positioning the camera for the best possible view and lighting. - Participants should consider their placement with respect to light and noise sources.
- If you have no experience with digital meetings, you may want to try out the set-up and communication between participants in advance, using the same equipment and location that will be used in the actual meeting.
- The IT division can avdise you about assistance, loan equipment etc.
