Lab-IT
This web page is under construction
Lab-IT is a new service provided by the IT division and developed in close collaboration with the laboratory departments. Lab-IT will ensure that insecure and vulnerable instruments can be safely connected to the UiB network.
Connect a Lab-PC to Lab-IT
Lab Administrator(s) can create an issue at hjelp.uib.no, providing relevant information like building, department, research group etc.
Functionality
Stand-alone/unmanaged Lab-PC (not managed by the IT division)
Access
The Lab Administrator(s) manage access via https://portal.uib.no. If you want access, contact your Lab Administrator. To find the name of your Lab Administrator(s), please see Overview LAB-IT
Automatic copy of raw data from Lab-PC to Lab-IT storage area
Lab-PC's (Windows/Linux) connected to Lab-IT will have raw data automatically copied from the Lab-PC to a common storage area (Lab-IT storage). The copy frequency is usually every 5 minutes, but there may be local adaptations. Data will be copied into a folder on Lab-IT storage that corresponds to the name of the Lab-PC.
Each research group have a separate storage area; please see Overview LAB-IT for more information.
In the Lab-IT storage, regular lab users should have read-only access. Only and Lab Administrator(s) should have write-access. Data may be copied to other desired areas for further processing. Write-access is not necessary in order to copy data from Lab-IT storage.
The common area (Lab-IT storage) is available from your office computer, self managed and private computers, please see this guide for more information.
Move files from Lab-IT storage to Lab-PC
Each Lab-PC have their own folder inside Lab-IT storage with the name "Flyttes_INN". Files that are saved in this folder are automatically moved to the corresponding Lab-PC and saved in: "C:\DataINN". The move frequency is usually every 5 minutes, but there may be local adaptations.
Backup of Lab-IT storage area
Lab-IT storage areas have a standard UiB backup regime:
- All new/changed files in Lab-IT storage are backed up every night.
- Up to 7 versions of every file is kept in backup.
- When a file is deleted, the last version of the file is kept for 1 year.
- A snapshot runs every hour during work hours (8-17), these are kept for about 3 days.
- Snapshots are run every night and kept for about 2 weeks.
Snapshots are directly available for Windows users as “Previous Versions”, where you may browse and copy old files. Non-windows users can for example log on to skrivebord.uib.no via remote desktop and access “Previous Versions”. You will need assistance from the IT division to retrieve backups older than 2 weeks.
To view snapshots: Right click inside your Lab-IT storage area -> Properties -> Previous Versions
No data is deleted from the Lab-IT storage area automatically. If a file is deleted from a Lab-PC, it will remain in the Lab-IT Storage area (given that the automatic copy job has run successfully).
The automatic copy job will always copy the newest data from the Lab-PC. If a file on the Lab-PC has the same path and name as a file on Lab-IT storage area, the newest version of that file will be written to Lab-IT storage. This way an old file on Lab-IT storage may be overwritten with a newer version from the Lab-PC. If this happens unexpectedly you can use snapshots/backup to retrieve the file that was overwritten.
Monitoring and remote access
Monitoring and remote access to Lab-PC’s are possible from terminal servers. You must use Remote Desktop to connect to the terminal server, please see the RDP guide below. Once you are logged on the terminal server, use the desktop icon "SelectRDPconnection" in order to connect to the Lab-PCs that belong to your research group. Lab-PCs that you connect to may have a variety of Operating Systems, but not windows versions older than Windows XP. It is also possible to connect to Lab-PC's with various Linux flavours using SSH (X2Go if you need a graphical interface).
Each research group have their own terminal server(s); please see Overview LAB-IT for more information.
Remote Instrument Supplier technician Access
In order to give a remote Instrument-supplier technician access to a Lab-PC, you need to connect to your terminal server and start TeamViewer. You must then give the TeamViewer ID and password to the technician. You need to be actively logged on the terminal server in order for TeamViewer to work. Once the remote technician can see/control your terminal server screen, you may start "SelectRDPconnection" icon on the desktop and connect to the chosen Lab-PC. This way, the technician can control the Lab-PC when you decide to give him/her access.
If you have problems or questions, please do not hesitate to contact us at hjelp.uib.no.
Image/backup of Lab-PC installation and setup
Some Lab-PC's have a complicated installation or setup, and it can be difficult to restore if it crashes. The IT division can create an image of the hard drive that can be restored. It is possible to extract files form the image as well. Be aware of:
- It is not possible to create an image of all Lab-PC's
- Sometimes, it is not possible to restore an image to another hard drive.
Would you like an image of a Lab-PC then create an issue at hjelp.uib.no
Managed Windows 10 Lab-PC
Lab-IT has a pilot solution for Windows 10 UiB-managed computers, where we offer self-service access management, remote access to the lab-PC and centralized storage (if needed). Read more Or contact us at hjelp.uib.no for details.
Long-term archiving (BILLY)
The storage for long-term archiving of large amounts of "cold data" is called BILLY. If you would like more information about BILLY, please make an issue to the IT service desk BRITA at hjelp.uib.no
General information about BILLY:
BILLY is a service meant for low-cost, long-term storage of data. It is meant as a location for “cold” data that one wants to keep without accessing it frequently. The data stored in Billy will have a long access time (several minutes), and the data stored here is not meant to be accessed very often. The type of data should be for example raw data from research projects, video files and other data that is finished and processed. If the data consists of many small files, Lab-IT will help you archiving it with tar/zip/rar or similar before it is copied into BILLY.
The service functions as a regular file-share like any other storage area, that can be accessed via SMB (Windows/Mac) or NFS (Linux). In the background, transparent to the user, the files are moved to low-cost tape storage. When the files are to be accessed after some time, the service needs to retrieve them from tape. This means that it will take some time from you open/copy the file until it is available. If you know that you need to retrieve many files/folders from tape at once, you can create an issue at hjelp.uib.no. This way we can retrieve it from tape beforehand, so that the files are available to you when you need them.
The cost of the service is NOK 250 pr terabyte, pr year. The service is sold in chunks of 50 terabytes. Your department will be invoiced twice a year based on the volume you have ordered. If you need more storage space you can create an issue at hjelp.uib.no, and we will allocate more space for you.
Errors
Please report errors at hjelp.uib.no
Questions
Questions can be asked at hjelp.uib.no
Changes
Would you like to suggest any changes in the setup at a specific laboratory, please contact the Lab-Administrator(s). If you would like to suggest any general changes to the Lab-IT setup please make an issue at hjelp.uib.no
Purchasing instruments
The IT division would like to be consulted before procurement of new instruments and software. Suppliers rarely consider IT management when they develop laboratory instruments and software. As a result, Lab-PCs are often delivered with a setup that the IT division find impossible to support. Therefore, there should be made some demands in the requirement specification. If you like support from IT division in this matter please make an issue at hjelp.uib.no
Overview Lab-IT
| Department | Researchgroup | Lab-PC name code | Lab Administrator(s) | Terminalserver | Path (1TB standard storage) | BILLY (Long time Archive) | |
| GEO | CORESCANNER | COR | Eivind Wilhelm Nagel Støren | iron.uib.no | \\Klient.uib.no\FELLES\LAB-IT\GEO\CORESCANNER\ | ||
| GEO | CT | ECT | Eivind Wilhelm Nagel Støren | neon.uib.no | \\Klient.uib.no\FELLES\LAB-IT\GEO\CT | \\klient.uib.no\FELLES\BILLY\Prosjekt\EARTHLAB\ | |
| GEO | EARTHLAB | ERT | Eivind Wilhelm Nagel Støren | xenon.uib.no | \\Klient.uib.no\FELLES\LAB-IT\GEO\EARTHLAB\ | ||
| GEO | ELMI | ELM | Olav-Audun Bjørkelund | \\klient.uib.no\FELLES\LAB-IT\GEO\ELMI | NA | ||
| GEO | FARLAB | FAR | Pål Tore Mørkved | helium.uib.no | \\klient.uib.no\FELLES\LAB-IT\GEO\FARLAB\ | NA | |
| GEO | GC-MS | GCM | Eoghan P. Reeves | \\klient.uib.no\FELLES\LAB-IT\GEO\GC-MS | NA | ||
| GEO | ICP | ICP | Siv Hjort Dundas | barium.uib.no | \\klient.uib.no\FELLES\LAB-IT\GEO\ICP | NA | |
| GEO | RAMAN | RAM | Olav-Audun Bjørkelund | calcium.uib.no | \\klient.uib.no\FELLES\LAB-IT\GEO\RAMAN | NA | |
| KJ | IR | INF | Egil Nodland | copper.uib.no | \\klient.uib.no\FELLES\LAB-IT\KJ\IR | NA | |
| KJ | NMR | NMR | John Georg Seland, Nils Åge Frøystein, Jose Guerrero, Jarl Underhaug | radon.uib.no | \\klient.uib.no\FELLES\LAB-IT\KJ\NMR | NA | |
| KJ | MS | MAS | Bjarte Holmelid | lead.uib.no | \\klient.uib.no\FELLES\LAB-IT\KJ\MS | NA | |
| KJ | GC | GLC | Bjarte Holmelid, Cecilie Sævdal Dybsland | zinc.uib.no | \\klient.uib.no\FELLES\LAB-IT\KJ\GC | NA | |
| KJ | HPLC | HLC | Bjarte Holmelid, Cecilie Sævdal Dybsland | osmium.uib.no | \\klient.uib.no\FELLES\LAB-IT\KJ\HPLC | NA | |
| KJ | ADSORPTION | ADS | Pascal Dietzel | iodine.uib.no | \\klient.uib.no\FELLES\LAB-IT\KJ\ADSORPTION | NA | |
| ILAB | FERSKVANN | FER | Reidar Handegård | boron.uib.no | NA | NA |
User guide
Access raw data
Off campus you can connect to UiB network using VPN. See [this guide for more information.]
Windows
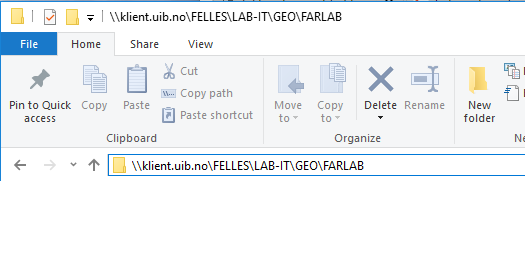
On a UiB managed computer, just type the path in Explorer
You can find the path for your lab here [Overview LAB-IT]
On a self managed or a private computer:
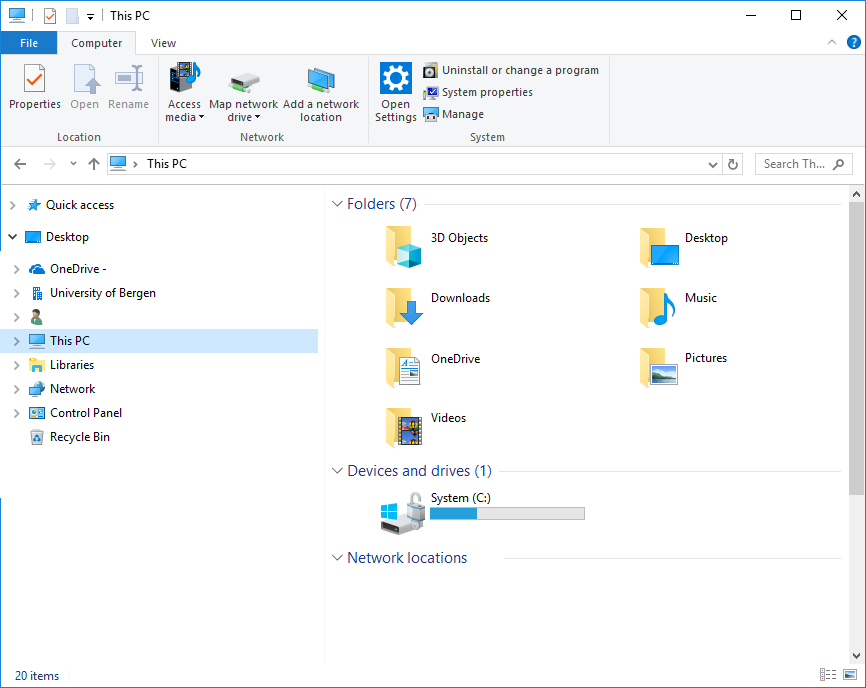
- Open Explorer
- Click on This computer in the left menu
- Then click on Map network drive button in the top menu
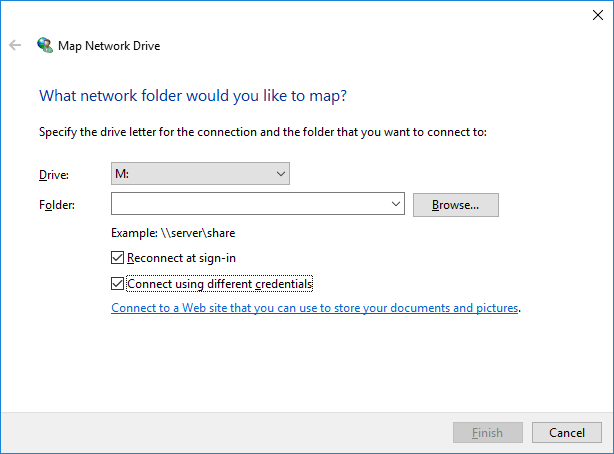
- Type the path in the folder field
- Check Connect using different credentials
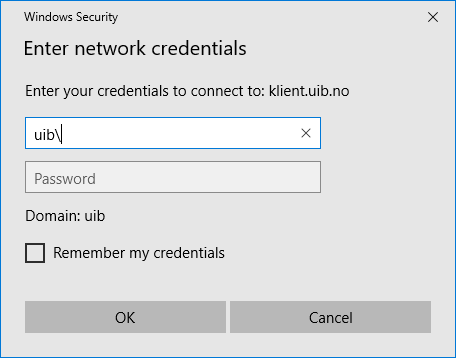
Type your uib username and password
- Type uib\ before your username
Mac
Please see https://it.uib.no/en/Mac_OS_X:_Connecting_to_your_network_share
Linux
Please see https://it.uib.no/Oppkobling_mot_Unix_hjemmeomr%C3%A5de
RDP
Windows
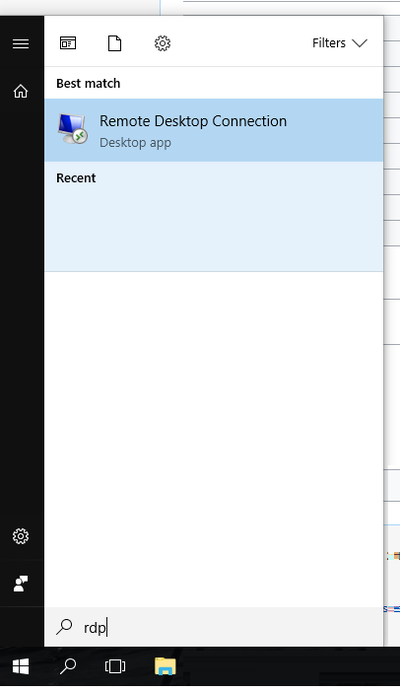
RDP (Remote Desktop Connection) is by default installed on all Windows computers. 1. Just click on the start button and type rdp. 2. Then, Click on the Remote Desktop Connection app.
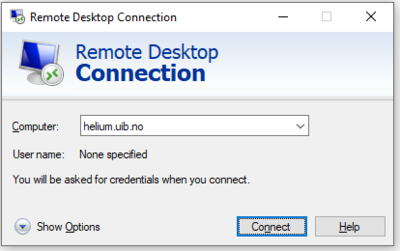
In the Computer field, type the name of the terminal server. If you have forgotten the name, see [Overview LAB-IT].
- In this example, we are connecting to helium.uib.no.
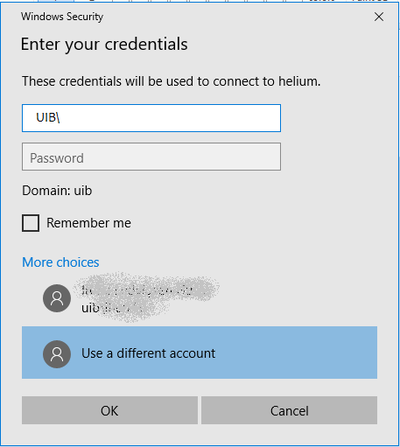
Type your UiB username and password
Be aware of:
- The domain should be set to uib, if not then type uib\ before your username
- If you can’t change the username, choose More choices and choose “Use a different account”
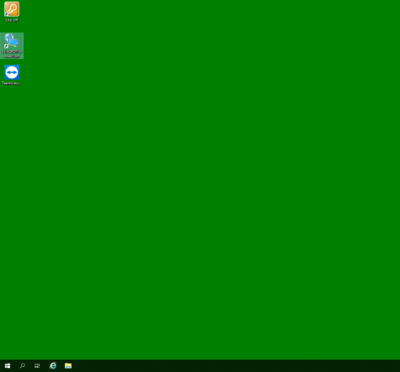
Connect to the lab-PC by double-clicking on the icon "SelectRDPconnection"
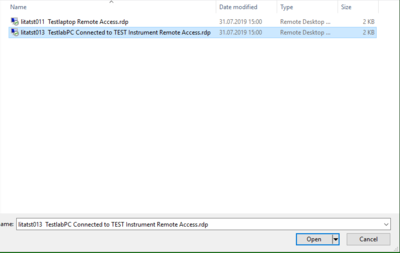
Select the lab-PC you want to connect to, and press "Open"
Mac
Install Microsoft Remote desktop from Managed Software Update or from Mac App Store.
1: Choose "new" to create a profile: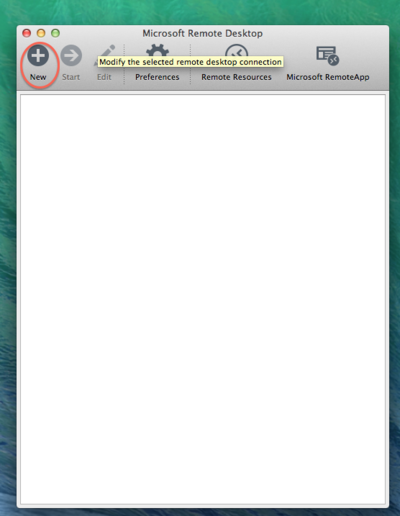
2: Type your username with uib\ in front as shown.
In the PC name field, type the name of the terminal server. If you have forgotten the name, see [Overview LAB-IT].
In this example, we are connecting to helium.
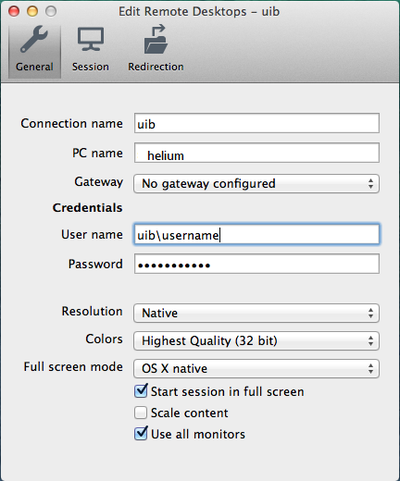
3: Close the window, mark the profile you just created and press start: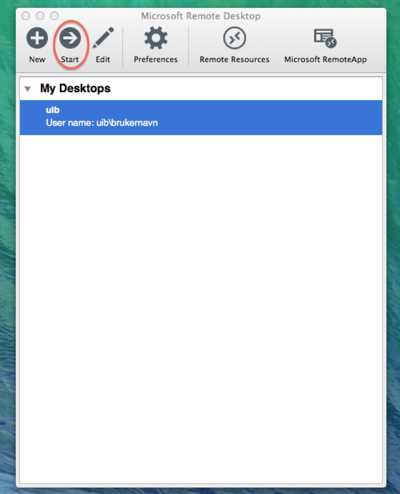
4: You will now see a page where you need to verify the certificate. Press continue. 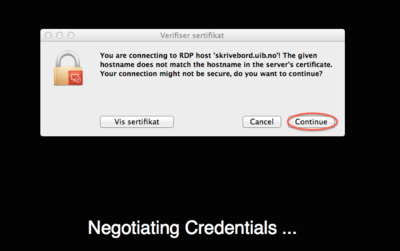
Linux
In this guide we are using rdesktop In Ubuntu the software can be downloaded from [Ubuntu softwarecenter], search for "rdesktop". You can also install the software from terminal using the following command: sudo apt-get install rdesktop
Start rdesktop by opening Terminal and run:
rdesktop -d uib -k no skrivebord.uib.no
Arguments
Rdesktop works with several arguments. The most important are described below. See rdesktop(1) for full description. In terminal, run:
man rdesktop
- Username and domain
   rdesktop -d uib helium
Rdesktop assumes you are using the same username on you machine as on the terminal. If this is not the case, you can set the username in the commandline with the argument "-u yourusername", like this:
  rdesktop -d uib -u abc123 skrivebord.uib.no
Remember to switch abc123 with your username.
- Keyboard
Standard keyboard in rdesktop is American. If you have a Norwegian keyboard you can set the change in rdesktop using the argument "-k no", like this:
  rdesktop -k no skrivebord.uib.no
- rdesktop-window size
To set a specific size for the rdesktop-window use argument "-g <size of the window, length x height>", like this:
  rdesktop -g 1024x768 skrivebord.uib.no
You can also use %
  rdesktop -g 90% skrivebord.uib.no
Setting the size in percentage works best if you only have one screen. If you use two screens, rdesktop will treat it as one extra large screen instead.
Rdesktop full screen: -f
  rdesktop -f skrivebord.uib.no
Using this command, rdesktop will cover both screens if using two. Use the key combination Ctrl+Alt+Enter to switch between Linux- and Windows environment.
Leave Lab-PC unlocked after a remote session (windows)
When disconnecting a remote session with a Lab-PC, the Lab-PC will be locked and users physically in front of the computer have to type in the password to unlock it. Sometimes it is necessary that the Lab-PC remain unlocked after a remote session (for example if using autohotkey or similar software). Follow this guide to keep the Lab-PC unlocked after a remote session:
When logged on a Lab-PC remotely via terminal server or https://student-ts.uib.no -> open a cmd console on the Lab-PC as administrator.
Type in the console and find the session ID of the active logged on user:
query session
It will look similar to this:
  SESSIONNAME          USERNAME          ID          STATE
  rdp-tcp              Admin             1           Active
When you are ready to disconnect the remote session, type in the cmd console (replacing the session ID and the password with those for the local user):
tscon sessionid /dest:console /PASSWORD:passwordforthelocaluser
For example:
tscon 1 /dest:console /PASSWORD:heihei
Lab Administrator
User guide: https://it.uib.no/ithelp/images/8/80/LAB-IT_Manager_-_Users%27s_guide.pdf
