Eduroam on Windows 8: Difference between revisions
No edit summary |
No edit summary |
||
| Line 3: | Line 3: | ||
The following is a guide describing how to set up Eduroam for operative system Windows 8 on personal computers. | The following is a guide describing how to set up Eduroam for operative system Windows 8 on personal computers. | ||
| Line 22: | Line 22: | ||
Step 5: Enter your username and password into the textfield and press "Ok". | Step 5: Enter your username and password into the textfield and press "Ok". "Username@uib.no" or "Username@ansatt.uib.no" | ||
[[File:eduroamusername.png]] | [[File:eduroamusername.png]] | ||
| Line 48: | Line 46: | ||
Step 10: In the textfield "Connect to servers", write "frigg | Step 10: In the textfield "Connect to servers", write "frigg.uib.no". | ||
[[File: | [[File:eduroamEAPNy.png]] | ||
Revision as of 13:29, 5 December 2017
The following is a guide describing how to set up Eduroam for operative system Windows 8 on personal computers.
Step 1: Make sure your wireless network card is turned on. To check this, look at the symbol for wireless network in the bottom right of your screen.
If there is a red x over the symbol, it means your wireless nettverk card is switched off.
Step 2: Click on the symbol for wireless network in the bottom right of you screen(it will look similar to a set of stairs.)
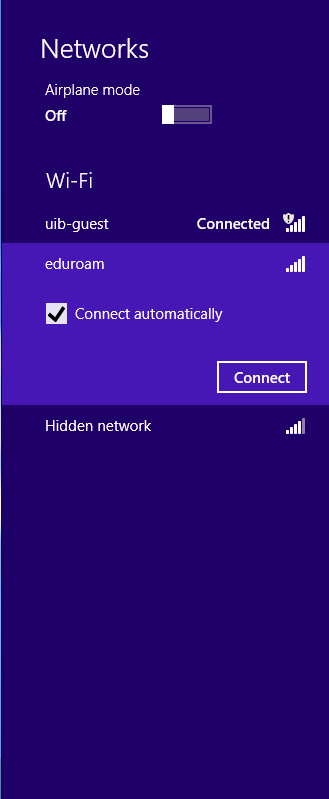
Step 3: Check the displayed list of networks. If eduroam is avaliable it should appear in the list.
Step 4: Click on eduroam and choose the option "Connect".
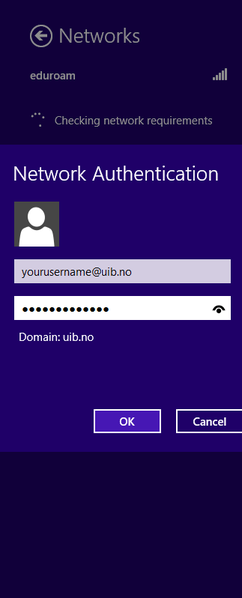
Step 5: Enter your username and password into the textfield and press "Ok". "Username@uib.no" or "Username@ansatt.uib.no"
Step 6: You will get a warning message that it "cannot comfirm servers identity". Click on "Connect".
Step 7: You should now be connected to eduroam. If not, repeat step 1 to 6.
Step 8: You can edit the eduroam connection properties which enable you to connect without a security warning.
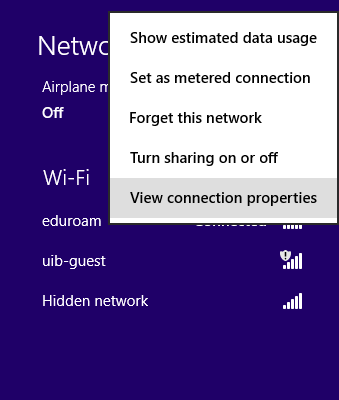
To do so, click on the symbol for wireless networks in the bottom right of your screen. Right-click on eduroam and choose show connection properties.
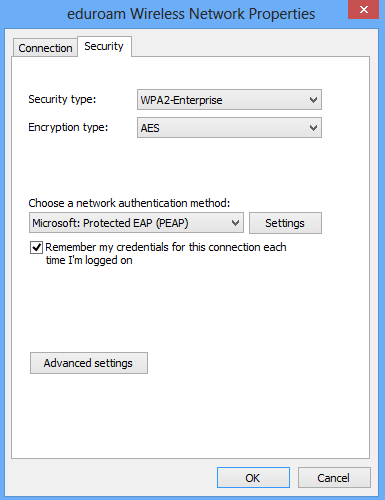
Step 9: Make sure your configuration matched the one under the image below. From here, click on settings.
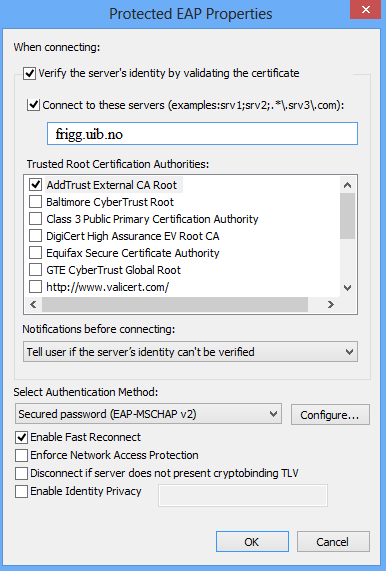
Step 10: In the textfield "Connect to servers", write "frigg.uib.no".
Step 11: Click on the checkbox "AddTrust External CA Root" and click Ok.
Step 12: As you did earlier, click on the wireless network symbol in the bottom right corner.
Step 13: Click on eduroam.
Step 14: Choose Connect and enter your username, password and click Ok, in the same way as in step 5.
Step 15: You should now be connected to eduroam without receiving a security warning.
