Nomachine: Difference between revisions
Redirected page to NX.uib.no |
No edit summary |
||
| Line 1: | Line 1: | ||
# | [[no:Nomachine]] | ||
__TOC__ | |||
Use the NoMachine software for graphical remote access to linux on the following server: | |||
* nx.uib.no | |||
The NX software ''NoMachine'' is a free, more effective and easy configurable alternative to xwin-32, VNC, VNC-SSH and similar products, with software accelerated OpenGL support. All data transmission are encrypted and include remote graphical access (X.org) to linux computers from external networks. The installation consists of two steps. | |||
# Download and install ''NoMachine'' | |||
# Configure the client | |||
==Installation of the NX Client for Windows== | |||
Download the ''NoMachine'' software from the following site: | |||
<u>http://www.nomachine.com/download</u> | |||
From a windows computer where you dispose an administrative account, run the downloaded *.exe file to install the software. (''NoMachine'' is also available for Mac OS X, Linux and Android/iOS.) | |||
== Configure NoMachine == | |||
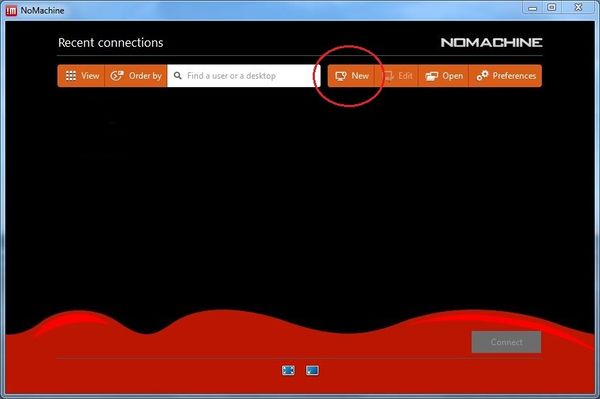
Start up "''NoMachine''" from the windows Programs menu. Click your way through the welcome menu until you get the window below. | |||
[[file:Nomachine-new.JPG|600px]] | |||
Click “New” to configure the connection to nx.uib.no. Walk through these steps: | |||
[[file:Nomachine-stages.JPG|600px]] | |||
* Protocol: choose «''SSH''» - Continue | |||
* Host: “''nx.uib.no”'' Port: “''22” ''- Continue | |||
* Authentication: “''Use the NoMachine login”'' - Continue | |||
* Authentication: (default choice'' “Load the DSA key used to connect to this server”'') - Continue | |||
* Save as: Name: “''UiB Login”'' - Done | |||
Now the configuration is finished. | |||
==Log in and use== | |||
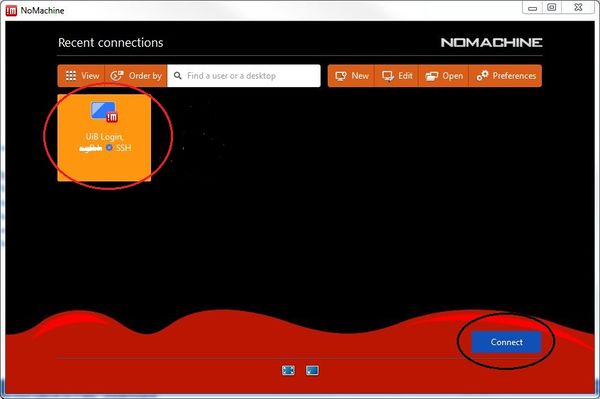
Choose “UiB Login and click “Connect”: | |||
[[file:Nomachine-connect.JPG|600px]] | |||
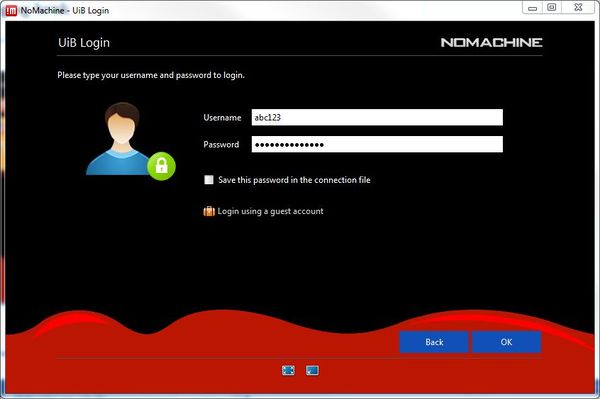
Give your user id and password. NB! Do not choose to save the password! | |||
[[file:Nomachine-logon.JPG|600px]] | |||
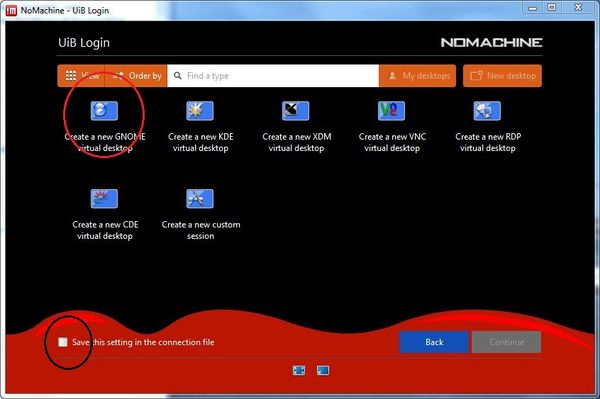
Click your way through the help pages until you get the window below: | |||
[[file:Nomachine-gnome.JPG|600px]] | |||
Choose GNOME virtual desktop (and if you like Save these settings …) and click «Continue». | |||
Now you should be started with your session. | |||
UiB ITA runs the nx.uib.no with these limitations: | |||
* max 1 active sessions for each user | |||
* SSL encryption for all traffic must be turned on (taken care of in these settings) | |||
Help can be found here https://www.nomachine.com/support | |||
Latest revision as of 13:23, 26 February 2015
Use the NoMachine software for graphical remote access to linux on the following server:
- nx.uib.no
The NX software NoMachine is a free, more effective and easy configurable alternative to xwin-32, VNC, VNC-SSH and similar products, with software accelerated OpenGL support. All data transmission are encrypted and include remote graphical access (X.org) to linux computers from external networks. The installation consists of two steps.
- Download and install NoMachine
- Configure the client
Installation of the NX Client for Windows
Download the NoMachine software from the following site:
http://www.nomachine.com/download
From a windows computer where you dispose an administrative account, run the downloaded *.exe file to install the software. (NoMachine is also available for Mac OS X, Linux and Android/iOS.)
Configure NoMachine
Start up "NoMachine" from the windows Programs menu. Click your way through the welcome menu until you get the window below.
Click “New” to configure the connection to nx.uib.no. Walk through these steps:
- Protocol: choose «SSH» - Continue
- Host: “nx.uib.no” Port: “22” - Continue
- Authentication: “Use the NoMachine login” - Continue
- Authentication: (default choice “Load the DSA key used to connect to this server”) - Continue
- Save as: Name: “UiB Login” - Done
Now the configuration is finished.
Log in and use
Choose “UiB Login and click “Connect”:
Give your user id and password. NB! Do not choose to save the password!
Click your way through the help pages until you get the window below:
Choose GNOME virtual desktop (and if you like Save these settings …) and click «Continue».
Now you should be started with your session.
UiB ITA runs the nx.uib.no with these limitations:
- max 1 active sessions for each user
- SSL encryption for all traffic must be turned on (taken care of in these settings)
Help can be found here https://www.nomachine.com/support


