Mac OS X: VPN: Difference between revisions
No edit summary |
|||
| Line 1: | Line 1: | ||
==Setting up VPN in Mac OSX== | ==Setting up VPN in Mac OSX== | ||
Check your internet connection | |||
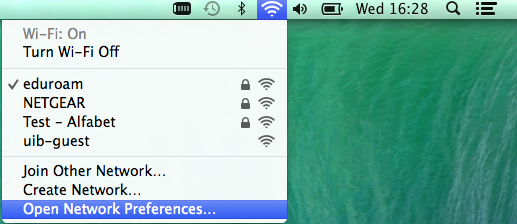
'''1.''' Press the network icon and choose "Open Network Preferences" | |||
[[File:NetPref.png|600px]] | |||
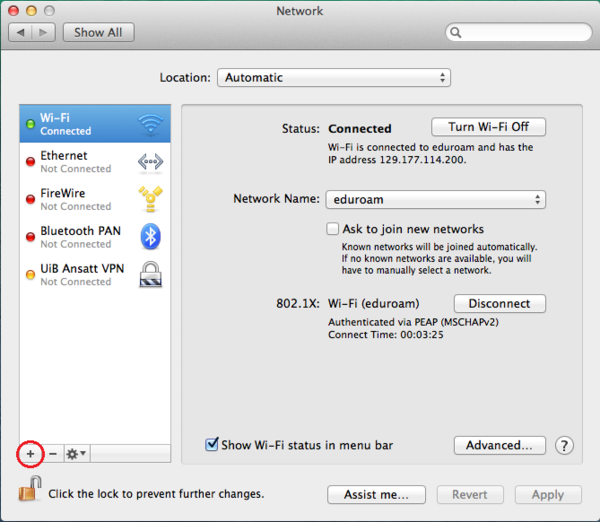
'''2.''' Press the pluss sign [+] down in the left corner | |||
[[File:AddNew.png|600px]] | |||
'''TIP:''' If the pluss sign is grayed out, click the lock to authenticate yourself.(On UiB client machine, use the install account) | |||
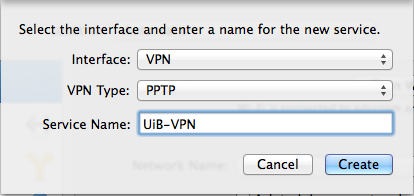
'''3.''' Fill in the interface window with: | |||
Interface: VPN | |||
VPN Type: PPTP | |||
Service Name: UiB-VPN (e.g) | |||
[[File:VPNSettings.png|600px]] | |||
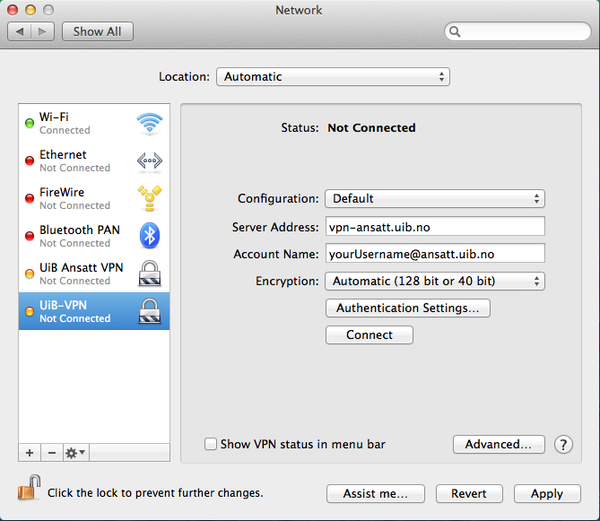
'''4.''' Fill in the following to configure: | |||
'''Employed:''' | |||
Server Address: vpn-ansatt.uib.no | |||
Account Name: yourUsername@ansatt.uib.no | |||
'''Student:''' | |||
Server Address: vpn-student.uib.no | |||
Account Name: yourUsername@student.uib.no | |||
'''TIP:''' Your username is the same as you log on to UiB-computers and other UiB-services with. | |||
[[File:VPNConfig.png|600px]] | |||
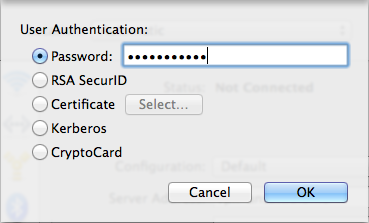
'''5.''' Press '''Authentication Settings''' | |||
'''6.''' Enter the password for your UiB-account and press OK | |||
[[File:VPNAut.png|600px]] | |||
'''TIP:''' Password including space and/or special character may cause problems when signing in. If this applies to you, you can change your password here [https://sebra.uib.no/sebra/Password SEBRA] | |||
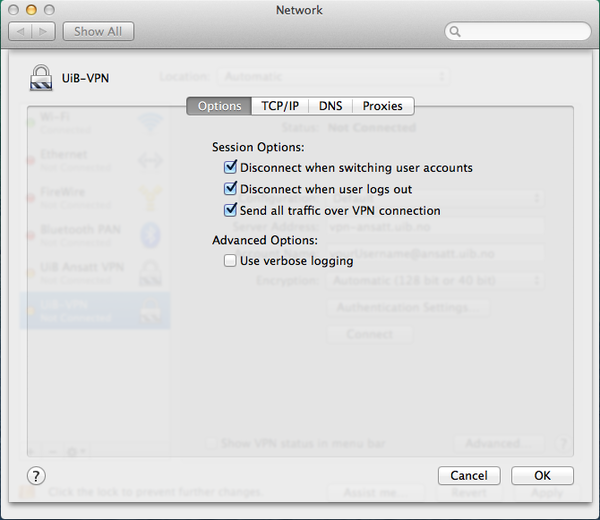
'''7.''' Press '''Advanced''' | |||
'''8.''' Check "Send all traffic over VPN connection" | |||
[[File:VPNAdv.png|600px]] | |||
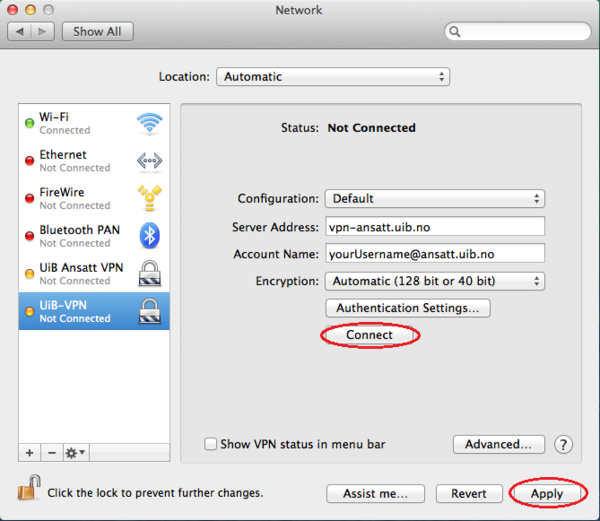
'''9.''' Press '''Apply''', then "Connect" | |||
[[File:VPNApply.png|600px]] | |||
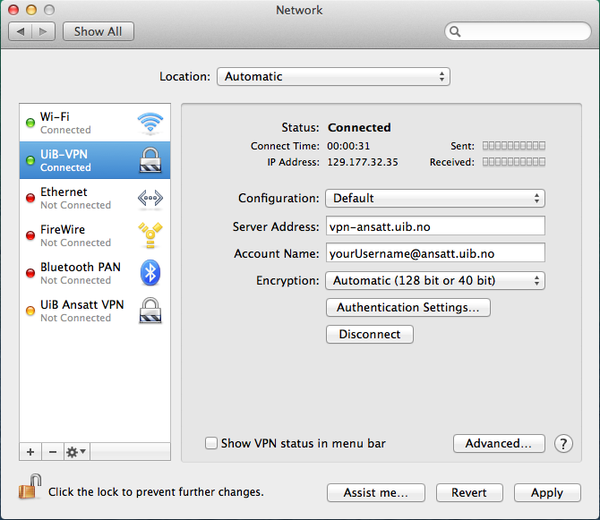
You shall now be connected | |||
[[File:VPNCon.png|600px]] | |||
[[Category:Private computer]] | |||
[[Category:Macintosh]] | |||
[[Category:VPN]] | |||
[[Category:User guides]] | |||
[[Category:Private computer]] | [[Category:Private computer]] | ||
Revision as of 11:28, 21 August 2014
Setting up VPN in Mac OSX
Check your internet connection
1. Press the network icon and choose "Open Network Preferences"
2. Press the pluss sign [+] down in the left corner
TIP: If the pluss sign is grayed out, click the lock to authenticate yourself.(On UiB client machine, use the install account)
3. Fill in the interface window with:
Interface: VPN
VPN Type: PPTP
Service Name: UiB-VPN   (e.g)
4. Fill in the following to configure:
Employed:
Server Address: vpn-ansatt.uib.no
Account Name: yourUsername@ansatt.uib.no
Student:
Server Address: vpn-student.uib.no
Account Name: yourUsername@student.uib.no
TIP: Your username is the same as you log on to UiB-computers and other UiB-services with.
5. Press Authentication Settings
6. Enter the password for your UiB-account and press OK
TIP: Password including space and/or special character may cause problems when signing in. If this applies to you, you can change your password here SEBRA
7. Press Advanced
8. Check "Send all traffic over VPN connection"
9. Press Apply, then "Connect"
You shall now be connected
